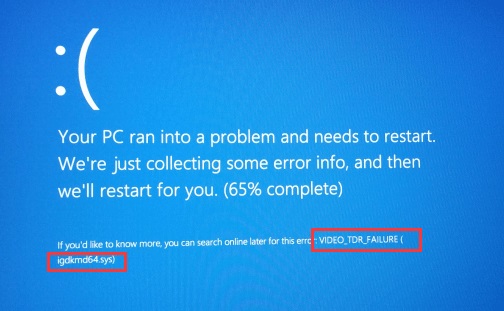
While VIDEO_TDR_FAILURE error is mostly because of a problem in the display driver of your Graphic Card, the error is mostly encountered by NVIDIA users. TDR stands for Timeout, Detection, and Recovery components in Windows.
VIDEO TDR FAILURE issue occurs on all operating systems on which is installed NVIDIA graphic card and graphic driver, including Windows Vista, Windows 7, Windows 8, Windows 8.1, Windows 10, Windows Server 2008 and Windows Server 2012.
There are a few reasons why this issue occurs, the most common being faulty graphic drivers and faulty graphic cards. The first issue is simple to solve, and the second issue is more expensive than the first solution because you will need to purchase a compatible graphic card.
An ATI graphic card is a viable alternative to that of an NVIDIA Graphic Card. The graphic driver not being compatible with the upgraded Windows version is also one of the reasons for the BSOD error. Therefore, you need to tread carefully when upgrading your OS.
Contents
- 1 18 Ways to Fix VIDEO TDR FAILURE Blue Screen of Death Error
- 1.1 Method #1 Check Windows Update
- 1.2 Method #2 Install the Latest Graphic Driver From the Official Website
- 1.3 Method #3 Downgrade the Drivers
- 1.4 Method #4 Change Global Settings in the NVIDIA Control Panel
- 1.5 Method #5 Enable NVIDIA nView
- 1.6 Method #6 Exclude Nvlddmkm.sys From Scans
- 1.7 Method #7 Copy Another Nvlddmkm.sys
- 1.8 Method #8 Change Windows Theme
- 1.9 Method #9 Uninstall Intel Dynamic Platform and Thermal Framework
- 1.10 Method #10 Disable Windows 10 Fast Startup
- 1.11 Method #11 System Restore
- 1.12 Method #12 Downgrade the Operating System Upgrade
- 1.13 Method #13 Disable Audio Device in BIOS or UEFI
- 1.14 Method #14 Update your BIOS or UEFI
- 1.15 Method #15 Clean Dust from Motherboard and Fans
- 1.16 Method #16 Change Cable
- 1.17 Method #17 Reinstall Windows 10 To Another Edition
- 1.18 Method #18 Change the Graphic Card
- 2 Conclusion
18 Ways to Fix VIDEO TDR FAILURE Blue Screen of Death Error
Method #1 Check Windows Update
Microsoft has come up with the idea of Patch Updates, allowing them the freedom to release updates from time to time. If Windows is not regularly updated, malware can cause damage to your OS, because of the missing software patches.
It is advised to use the officially licensed version of Microsoft and use the automatic update feature to get rid of such errors. If using a Microsoft graphic card, check for available driver updates of your graphic card. Although all operating systems follow the basic trend, follow these steps to check available updates:
Step 1: Firstly, use Windows + I shortcut to open Windows Settings.
Step 2: Secondly, select Update & Security.
Step 3: Thirdly, click the Windows Update tab.
Step 4: Next, use Check for Updates and install if any.
Step 5: Lastly, reboot your PC to see the VIDEO_TDR_FAILURE error is resolved.
Read More:
Method #2 Install the Latest Graphic Driver From the Official Website
If you do not install a Microsoft driver, uninstall the current driver with Display driver Uninstaller and reinstall the latest driver from the NVIDIA website. In the first step, we will uninstall the current driver, and install the NVIDIA graphic card in the second driver.
You need to make sure that the graphic card you are downloading is compatible with your hardware as well as your operating System. The operating system architecture is an integral part of choosing a driver. For example, we have to download a driver for the 32-bit System if you are using a 32-bit operating system. A simple guide to doing the same is:
Step 1: Open any Internet browser like Google Chrome, Mozilla Firefox, Edge, etc.
Step 2: Open an appropriate website and download DDU (Display Driver Uninstaller)
Step 3: Start DDU (Display Driver Uninstaller).
Step 4: Select the “Clean and Restart” option.
Step 5: After this step graphic driver will be uninstalled from your computer.
Step 6: Open NVIDIA official website.
Step 7: Choose proper graphic card under Manual Driver Search dropdown and select Start Search. You need to download the driver for your machine instead of blindly selecting anyone.
Step 8: The result of the search includes the list of all available graphics for the System. The latest version of graphic drivers is the first in the result list. If the first driver is in beta version, it is not recommended to download the beta driver.
Step 9: Click on the second driver in the list, it is GeForce Game Ready Driver – WHQL. Check “Agree & Download” to confirm that you have read and agree to be bound by the License For Customer Use of NVIDIA Software for the use of the driver. The driver will start downloading instantly after clicking on the “Agree & Download” button. NVIDIA advises the users to update the driver to its latest version.
Step 10: Install graphics driver.
Step 11: Restart your PC.
Step 13: Your Windows system is free of VIDEO_TDR_FAILURE error.
Method #3 Downgrade the Drivers
A lot of applications that are compatible with the lower versions usually work with the newer Windows as well. Therefore, we suggest you download the graphics driver for a lower version of the operating system and use the same for your current version.
For example, if you are using Windows 10 32-bit, you will need to download the driver for 32-bit, it should be Windows 7 32-bit or Windows 8 32-bit. The same can be done with a 64-bit operating system. Before downgrading a driver, you have to follow the second method to uninstall the DDU first.
Method #4 Change Global Settings in the NVIDIA Control Panel
NVIDIA install its own additional specifications to help make your game-play even better. You need to manually change some settings to avoid this error.
Step 1: Press Windows + S and search for NVIDIA Control Panel.
Step 2: Open NVIDIA Control Panel.
Step 3: Scroll to 3D Settings.
Step 4: Select “Manage 3D Settings“.
Step 5: Choose the “Global Settings” tab.
Step 6: Navigate to “Preferred graphics processor” and chose “High-Performance NVIDIA Processor“.
Step 7: Scroll down and find “Power management mode” and change to “Prefer Maximum Performance.”
Step 8: Select “Vertical Sync” and change to “OFF“.
Step 9: Restart your PC.
Step 10: Check if the VIDEO TDR FAILURE error message is gone or not.
Method #5 Enable NVIDIA nView
NVIDIA automatically installs NVIDIA NView manager when you install its driver. nView is one of the few applications which helps your productivity in a professional workspace. Few users used the nView manager to get rid of the BSOD error.
Step 1: Hold the Windows logo and press R.
Step 2: Type control panel and press Enter.
Step 3: Filter icons by large icons.
Step 4: Open NVIDIA NView Desktop Manager.
Step 5: Under nView Desktop Manager click enable and select “Apply” and then OK.
Step 6: Restart your System.
Step 7: Enjoy your Windows while not encountering VIDEO TDR FAILURE.
Method #6 Exclude Nvlddmkm.sys From Scans
Antivirus scanning can create a huge mess as Windows sometimes stop running because of this BSOD error. It is recommended to exclude nvlddmkm.sys file as an exception while antivirus scans. Windows provides us with its own security with Windows Defender, and we need first to try exempting this File from the Windows defender scan.
Step 1: Click on the Start menu and type Windows Defender.
Step 2: Open Windows defender as an administrator by right-clicking on it.
Step 3: Select Yes to confirm that the Windows defender is running as an administrator.
Step 4: Select “Settings” at the top right corner.
Step 5: Choose “Add an Exclusion” under “Exclusions“.
Step 6: Click on “Exclude a File“.
Step 7: Scroll to folder drivers at C:\Windows\System32\drivers
Step 8: Click on “Exclude this file“.
Step 9: Check if the File is exempted.
Step 10: Restart your Windows and check if this solved the VIDEO TDR FAILURE issues.
Method #7 Copy Another Nvlddmkm.sys
In this method, we create another nvlddmkm.sys file to make sure that there is no single corrupt file causing the error.
Step 1: Use shortcut Windows + E to open File Explorer.
Step 2: Move to C:\NVIDIA
Step 3: Select file nvlddmkm.sys and copy the same.
Step 4: Paste file to the root of C:
Step 5: Navigate to C:\Windows\System32\drivers
Step 6: Find nvlddmkm.sys.
Step 7: Rename file to nvlddmkm.sys.old.
Step 8: Click the Start menu and type Command Prompt.
Step 9: Open command prompt as an administrator.
Step 10: Enter the command exe nvlddmkm.sy_ nvlddmkm.sys. This command will allow you to unpack the nvlddmkm.sys file (which was previously saved at the root of C:) and create a new file instance.
Step 11: Copy the new File to C:\Windows\System32\drivers.
Step 12: Restart your Windows and check for VIDEO TDR FAILURE error.
Method #8 Change Windows Theme
This may seem like a bizarre solution, but it has proved to be useful for many users. Showing the basic method of changing Windows seven theme is as follows:
Step 1: Right-click on Desktop and choose Properties.
Step 2: Change the Windows theme to Windows 7 Basic.
Step 3: Restart your PC.
Step 4: Check if the VIDEO TDR FAILURE error still exists or not.
Method #9 Uninstall Intel Dynamic Platform and Thermal Framework
The control of CPU is done by the Intel Dynamic Platform & Thermal Framework. This software is directly involved with CPU power/performance & fan speeds for better consistency during gaming or other heavy-duty applications. Uninstalling this software may solve the problem at hand.
Step 1: Start run window using Windows + R.
Step 2: Type appwiz.cpl to enter the command.
Step 3: Select Intel Dynamic Platform & Thermal Framework
Step 4: Right-click on the Intel Dynamic Platform & Thermal Framework and choose Uninstall.
Step 5: Wait until Windows completes the uninstall procedure completely.
Step 6: Restart your System.
Method #10 Disable Windows 10 Fast Startup
Windows 10 has come up with a new technique named “Fast Startup” to help faster start of PC after shutdown. Much like its name, it is quite useful, but we need to disable this particular feature to stop the BSOD error.
Step 1: Use shortcut Windows + X to open the menu.
Step 2: Type control panel and press Enter.
Step 3: Navigate toward “Hardware and Sound“.
Step 4: Select “Power Options“.
Step 5: Open “Choose what power buttons do.”
Step 6: Click “Change settings that are currently unavailable.”
Step 7: Uncheck “Turn on fast startup (recommended)“.
Step 8: Save changes and Restart your Windows PC.
Method #11 System Restore
Windows regularly come up with updates to improve the working of the operating system. Sometimes, an upgrade instead of helping run things smoothly turns out to worsen the situation. It is therefore recommended to revert back to the settings before the update by creating a system restore checkpoints.
If you have already set a restore checkpoint, use that to revert back to when the PC worked without any issues. If not, then move on to the next method. Here is a simple guide to enable “System Restore”.
Step 1: First of all, you should use the shortcut Windows + R to start “Run“.
Step 2: Secondly, enter “rstrui.exe.”
Step 3: Next, select the “Choose a different restore point” option and proceed.
Step 4: Select an appropriate checkpoint and Enter.
Step 5: Click on “Finish“.
Lastly, restart your system and wait until it completes the System Restore procedure.
Method #12 Downgrade the Operating System Upgrade
It is most probable that once you upgraded your Operating System with a higher version, the graphic card may not be compatible with the latest version of your OS. If you have already updated your Windows Vista, Windows 7, Windows 8, or Windows 8.1 to Windows 10, and the BSOD error is shown, it is suggested to downgrade or revert back to your old OS using a Bootable USB flash drive or a Windows DVD.
Method #13 Disable Audio Device in BIOS or UEFI
Disabling the onboard card also eliminates the BSOD problem. Access to BIOS or UEFI is a prerequisite for this method. Access to the mentioned depends on the company.
For example, Dell users can press F2 during boot while HP users need to press the F10 button. It is suggested to read the technical manual of your device. The following is a simple guide to disable audio card for an ASUS motherboard.
Step 1: First of all, turn ON your System or restart if already ON.
Step 2: During the boot process press Del or F2 to access BIOS or UEFI
Step 3: Following this, press F7 to open “Advanced Mode“.
Step 4: Next, select OK to confirm access to Advanced Mode
Step 5: Select Advanced, and then chose the “Onboard Devices Configuration” option.
Step 6: Navigate to onboard audio devices. You will see two audio devices HD Audio Controller and Realtek LAN Controller and Disable them.
Step 7: Press ESC on the keyboard and after that click Save Changes & Reset.
Step 8: Lastly, restart your PC.
Method #14 Update your BIOS or UEFI
Updating your BIOS or UEFI firmware is one of the most straightforward solutions to BSOD error. At first, you need to know the current version of BIOS or UEFI. The procedure of updating BIOS or UEFI is not the same for all motherboards.
Check the technical documentation of your motherboard, section BIOS or UEFI. Follow these steps to update BIOS/UEFI on ASUS P8B75-M motherboard:
Step 1: Firstly, hold the Windows logo and press R to start “Run“.
Step 2: Secondly, enter msinfo32.exe.
Step 3: Navigate to BIOS Version/Date.
Step 4: Check the current version of BIOS and UEFI firmware.
Step 5: After that, open any Internet browser.
Step 6: Open ASUS’s website to download the new BIOS version. If the latest version is an upgrade as compared to your current version, you need to download the same your USB flash drive.
Step 7: Next, Restart your computer.
Step 8: During boot process press F2 or Delete to access BIOS or UEFI.
Step 9: Press F7 to access Advanced mode.
Step 10: Click OK to confirm accessing Advanced mode.
Step 11: Following, choose ASUS EZ Flash Utility.
Step 12: Then, select an update file from USB flash drive and click Install.
Step 13: Lastly, restart your Windows.
Step 14: Run msinfo32.exe again and check the current BIOS version to be sure that BIOS is successfully updated to a newer version.
Method #15 Clean Dust from Motherboard and Fans
Sometimes the solution to VIDEO TDR FAILURE error lies with the hardware and not with the software. Furthermore, the PCIe slots and fans can be dirty, and we can simply clean dust from ports, slots and the fans. If you are in doubt overdoing this yourself, you can always hand it over to a PC repair service.
Method #16 Change Cable
Few users solved their problem by replacing the cable that connects the computer’s CPU with the monitor. If you are using VGA or DVI, please change them to HDMI cable. Moreover, if your monitor supports only VGA or DVI, try to change from VGA to DVI, and vice versa.
Method #17 Reinstall Windows 10 To Another Edition
Changing Windows 10 version is also a viable solution. There is no issue on Windows 10 1015, build 10586. On other versions, including Windows 10 1607 and Windows 10 1703, BSOD is still there. Therefore, we conclude that installing a different version is a better method than most.
Method #18 Change the Graphic Card
Last but not least, this method is to buy a new graphic card. Just check for the compatibility of your System and its motherboard with the graphic card and obviously the Operating System. Please refrain from buying a graphic card which is only compatible with Windows Vista, and you want to install that graphic card on Windows 10.
Also Read:
- Device Descriptor Request Failed
- Update Error Code 0x80070643
- Steam Download Stopping
- Res://aaResources.dll/104
Conclusion
Lastly, BSOD error is one of the most frustrating VIDEO TDR FAILURE (nvlddmkm sys) error that a user an encounter. While 18 methods may seem too many, but it is necessary to get a hold of the fact that this blue screen error can lead to a huge number of problems.