Counter-Strike Global Offense is a multiplayer game launched in the year 2012. The most attractive feature offered by the game is matchmaking, which allows players to play on dedicated Valve servers, as well as will enable members of the community to host their matches.
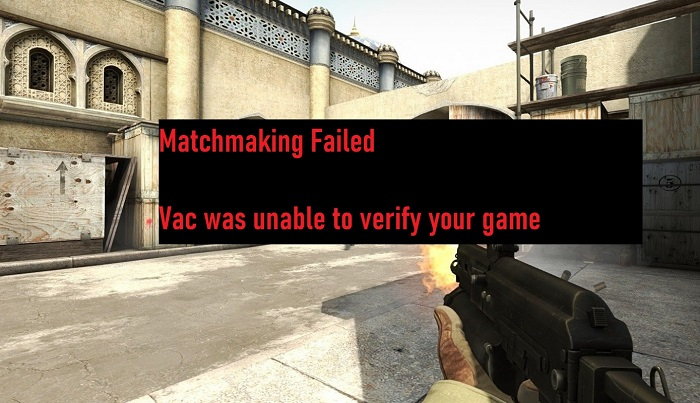
If you are a regular CS: GO player, you must have come across problems VAC Was Failed to Verify the Game Session. Don’t worry! We have got you covered.
Contents
How To Fix VAC Was Failed To Verify the Game Session Error
You don’t have to try all the solutions mentioned below. Just go on trying them in a chronological order till the particular solution works right for you.
Read Also:
Method #1 Reboot Your Computer System
It might sound silly and simple, but for some users, this method has been proved effective. Due to corrupt cache files, the Valve Anti-Cheat (VAC) usually fails to verify your game session.
Hence matchmaking fails. So without any second thoughts, first reboot your computer system and launch the game. If this method fails, there are four more methods to go.
Method #2 Log out of Steam and Log in Again
Some users have insisted that due to server timeout, VAC failed to verify the game session, and simply logging out and logging in to Steam have helped them. This method is simple and requires no expertise in computer skills.
If that fails, try to restart Steam in offline mode. For doing this, follow the steps below.
Step 1: Open Steam.exe.
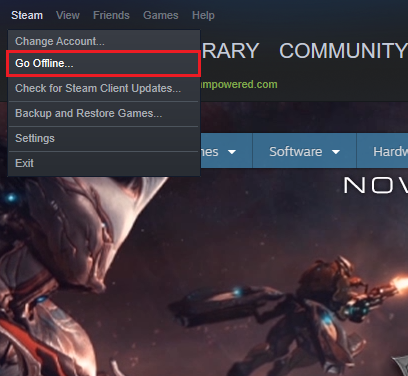
Step 2: Click on “Steam” located at the top left corner.
Step 3: Then chose “Go offline“.
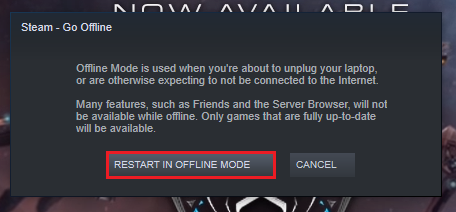
Step 4: When prompted, chose “Restart in Offline Mode“.
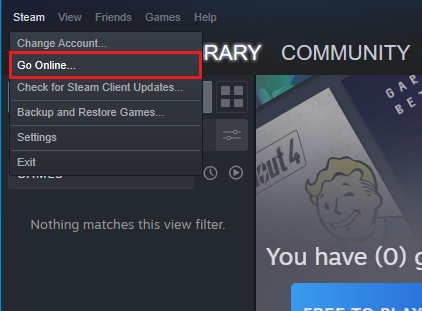
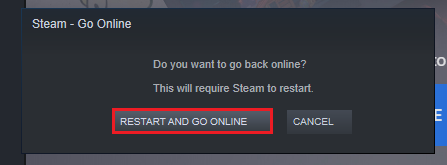
Step 5: Open Steam again, chose “Go online“.
Step 6: When prompted, chose “Restart and go Online“.
Step 7: Now launch the game.
Method #3 Verify the Game Files
Very often, users share CS: GO data through thumb drives. It puts the game files in a vulnerable position, increasing the chance of corrupt game files. Therefore, it becomes very important to check the integrity of the game files. Follow the steps below to check the integrity of the game files.
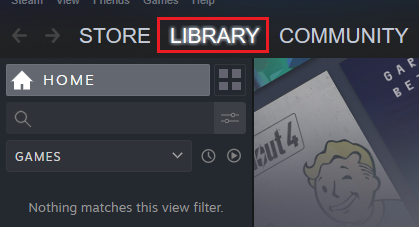
Step 1: Open Steam client.
Step 2: Click on the “Library” located next to the Store.
Step 3: Right-click on the Counter-Strike: Global Offensive game.
Step 4: From the drop-down menu, chose “Properties“.
Step 5: Click on “Local Files“.
Step 6: Under local files, click on “Verify Integrity of Game Files“.
Step 7: Wait until the process is completed then Exit.
Step 9: Launch your game.
Method #4 Repair the Steam.exe
It is quite possible that the Steam system files are corrupt and that is interfering with Valve Anti-Cheat for which the game session is not being verified. It is very easy to repair Steam system files. Follow the instructions mentioned below.
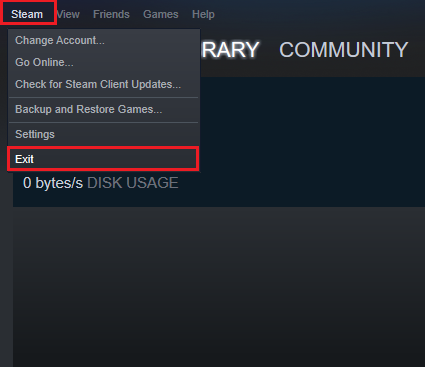
Step 1: Click on “Steam” located at the top left corner and chose “Exit“.
Step 3: Click on the “Start” button.and type “cmd“.
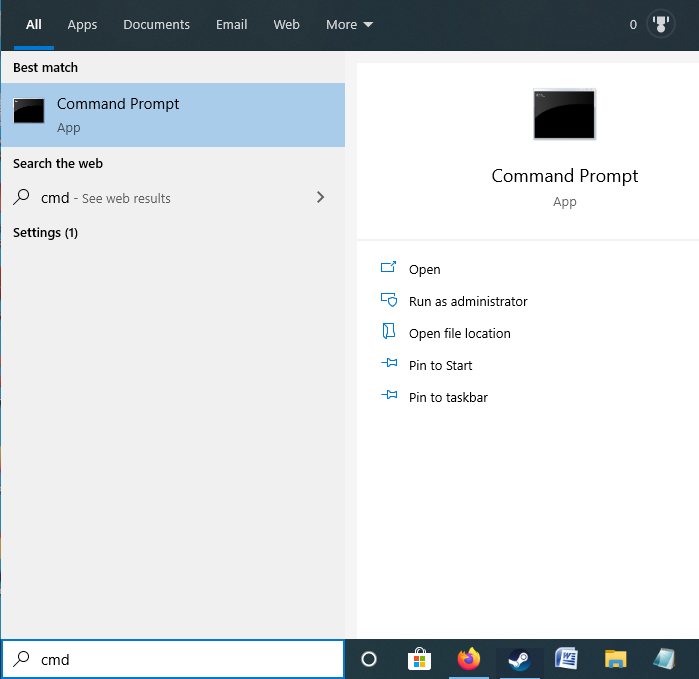
Step 5: Right-click on Command Prompt, and run it as Administrator.
Step 6: Depending on the system file location of Steam, type the location.
Note: Usually the file location is "C:\Program Files (x86)\Steam\bin\SteamService.exe" /repair at the end press Enter.
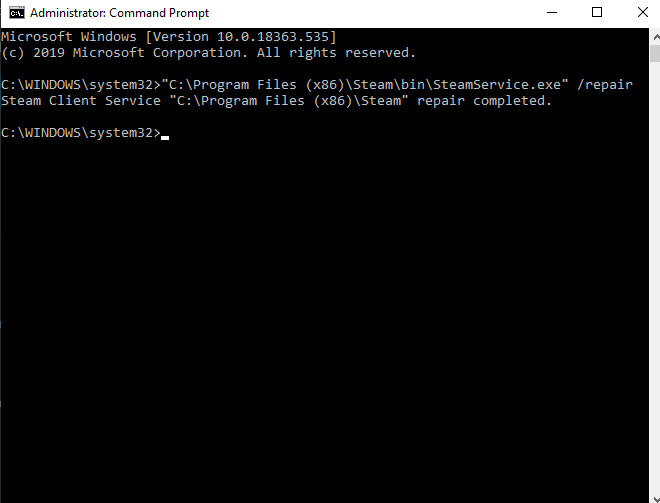
Step 8: Open the Steam.exe and launch the game. This should fix the VAC was Unable to Verify the Game Session error.
Method #5 Exclude Game Directory from Antivirus scan
Third-party Antivirus software frequently scans drives for viruses and bad sectors. That also includes software file location in Windows drive. It is advised to users to remove the game directory that is CS manually: GO system files from being scanned by third-party Antivirus software.
Antivirus software try to remove bad sectors, virus, and other unnecessary files. While doing the scans, Antivirus software removes files that are important for the game, and hence, the problem with VAC arises.
Read Also:
- Confirm Form Resubmission (err_cache_miss) Error in Chrome
- WMI Provider Host (WmiPrvSE.exe) High CPU usage on Windows 10
- Steam Missing File Privileges Error in Windows 10
- Your Windows License Will Expire Soon Error in Windows 10
- Digital TV Tuner Device Registration Application
- Application Error 0xc0000005
Conclusion
So these were all the effective methods that worked for the majority of the users playing CS: GO. If somehow, these methods have failed, try re-installing CS: GO and the steam client. Happy playing!