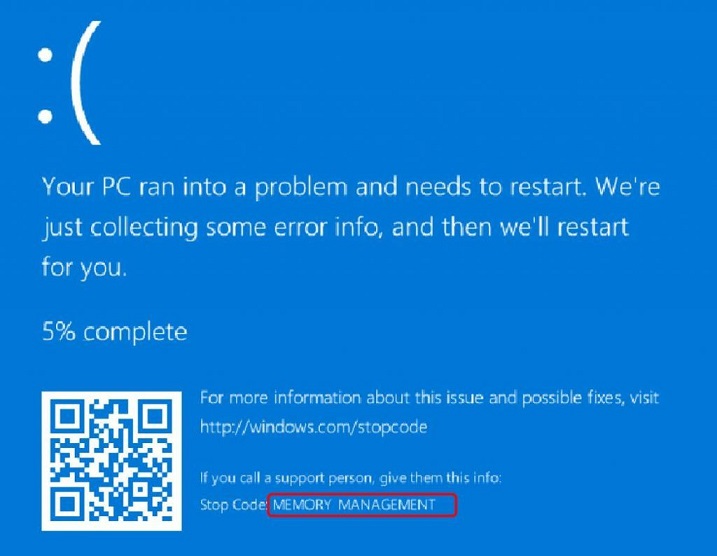
Stop Code Memory Management error, like several other errors, causes the Blue Screen of Death (BSoD) to appear. The Blue Screen of Death, which is caused by an error regarding a system process, displays the message “Your PC ran into a problem and needed to restart.
We’re just collecting some error info, and then we’ll restart for you“. This message is followed by the stop code, which mentions the Memory_Management error.
Users of all versions of Windows OS, be it Windows XP, Windows 7, Windows 8, Windows Vista, or Windows 10, have reported having faced this error.
It usually takes place when processes with high memory usage are run, for instance, games with heavy and complex graphics, VR games, or 4k live streaming. This article is about the scenarios in which the Memory Management error occurs and the ways to fix it.
Contents
- 1 Why Memory Management Error Occurs?
- 2 12 Ways to Fix Stop Code Memory Management Error Message in Windows 10
- 2.1 Method #1 Run A Full System Scan
- 2.2 Method #2 Run SFC Scanner
- 2.3 Method #3 Run Windows Memory Diagnostic Tool
- 2.4 Method #4 Revert Your PC Settings to Default If you Overclocked It
- 2.5 Method #5 Repair Your Registry
- 2.6 Method #6 Update your OS
- 2.7 Method #7 Clean Your Temporary Files and Folders
- 2.8 Method #8 Check Your Disk for Errors
- 2.9 Method #9 Remove Recently Installed Software
- 2.10 Method #10 Check for Programs Causing Memory Leaks
- 2.11 Method #11 Manually increase Virtual Memory
- 2.12 Method #12 Reset the PC
- 3 Conclusion
Why Memory Management Error Occurs?
The Memory Management error may occur due to a number of reasons, be it faulty graphic drivers, corrupted system files and registry, RAM problems, or hardware issues. Whatever be the cause, the error along with the BSOD may occur in different patterns, creating different situations.
The Blue Screen of Death, along with the stop code, may just be a one-time occurrence. After one restart, it may not occur again immediately. Thus, the first and simplest option to fix this error, like many other errors, is just to restart the system.
On some occasions, however, the error code and blue screen may keep occurring in a loop. In such a scenario, the blue screen appears every time the system is restarted. This may indicate a more serious problem. In the worst scenario, memory management may crash due to the problem. Using the computer then becomes difficult.
Also Read:
12 Ways to Fix Stop Code Memory Management Error Message in Windows 10
If a simple restart fails to fix the problem, and the Blue Screen of Death with the Stop Code Memory Management error code persists, there are other options to fix it. The following are the various ways to fix this error.
Method #1 Run A Full System Scan
Malware attacks can cause the Memory Management error. A full system scan by the Windows in-built Antimalware software (Windows Defender), or by a third-party antivirus program will reveal if there has been a malware intrusion. To run the Windows Defender system scan, follow the instructions below:
Step 1: Go to Settings → Update and Security and select Windows Defender. Alternatively, search Windows Defender in the Windows search bar and open it.
Step 2: Go to “Virus and Threat Protection.”
Step 3: In the Virus and Threat Protection window, click on the Advanced Scan option.
Step 4: Select the Full Scan option.
Alternatively, download and install antivirus software from a reliable third-party source online. Then open the program and follow the displayed instructions to conduct a scan.
Method #2 Run SFC Scanner
The Stop Code: Memory_Management error may be due to corrupted system files. In such a case, a System Files Checker (SFC) scan may solve the problem. Following are the steps to conduct an SFC scan:
Step 1: Search “Command Prompt” in the Windows search bar, then right-click on the Command Prompt option and select “Run as administrator.”
Step 2: In the Command Prompt window, type the command “sfc /scannow” and hit Enter. The process of scanning will take about 15 to 30 minutes.
Step 3: In case of any system file corruption, it will be detected and repaired. Then, restart the system.
Method #3 Run Windows Memory Diagnostic Tool
A problem with the system RAM is a major cause of memory management error. If your RAM is facing issues, it needs to be replaced. But first, it needs to be verified whether the problem is indeed due to the RAM. For this, the Windows Memory Diagnostic tool needs to be run. Following are the steps to do so:
Step 1: Open Windows Memory Diagnostic by directly searching it in the Windows search bar. Alternatively, open it by typing “mdsched.exe” in the Run dialogue box (open it by pressing Windows + R).
Step 2: In the small Windows Memory Diagnostic window, select the option “Restart Now and check for problems.” Make sure that before selecting this option, all your pending tasks and files are saved.
Alternatively, select the other option “Check for problems the next time I start my computer” if you are not ready to restart at the moment. Then restart later.
Step 3: Once the diagnostic tool has concluded its process, any error in the RAM will be detected.
Check the reported errors, and search their error codes on Google for specific solutions to them. The RAM may have to be replaced altogether.
Method #4 Revert Your PC Settings to Default If you Overclocked It
Many users install overclocking software in order to enhance the speed of the computer’s processes. This ideally is intended to improve the functioning of the device and deliver faster results. However, overclocking may lead to overheating and damage the components of the computer
This, in turn, affects various processes, including memory management. Thus, in case your computer has an overclocking program installed, it needs to be disabled. Disabling the overclocking feature will restore the computer’s settings to the default speed and configuration, and prevent further damage. This should rectify the problem. This solution is not applicable if your PC is not overclocked in the first place.
Method #5 Repair Your Registry
Another possible cause of the Memory Management error is that there are corrupted or missing registry items. To detect any registry problem and conduct repairs, use any PC repair tool. Download and install such a tool online for free, and run it to repair your registry.
Before implementing a registry repair tool, make sure to backup your registry items. In case the new versions added cause any problem, the original ones can be restored. To go to the Registry Editor, type “regedit” in Run (open it by pressing Windows + R) and press Enter. A System File Checker (SFC) scan should also detect and repair any issue with the registry. Check solution 1 to carry it out.
Method #6 Update your OS
The issue may also be due to pending system updates. Microsoft periodically releases updates to Windows OS for improving the system’s features and rectifying issues. In case the latest update is not installed, various errors may occur, including the Memory Management error. To update the Windows OS, proceed as follows:
Step 1: Open Settings in the Start menu, or by pressing Windows + I.
Step 2: In Settings, go to Update and Security.
Step 3: In Update and Security, select Windows Update in the left panel
Step 4: In Windows Update, check for available updates. Then install them and restart the system.
Method #7 Clean Your Temporary Files and Folders
Several temporary files and data are generated by our regular activities on the computer, especially online activities. These are unnecessary files accumulated by the computer. This accumulation leads to the slowing of processing speed and hampers the regular functioning of programs. Thus, errors, including that of memory management, are caused. Clearing out all the temporary files and folders may thus fix Stop Code Memory Management error.
We can use the Disk Cleanup feature to clean junk files. Following are the steps to run Disk Cleanup in Windows 10:
Step 1: Open Disk Cleanup by searching it in the Windows search bar.
Step 2: Select the files you intend to clean. On highlighting each option, the tool will reveal the amount of space that will be freed on clearing it.
Step 3: After selecting the files, click on “Clean up system files.”
Following are the steps to run Disk Cleanup in Windows 7:
Step 1: Open Disk Cleanup by searching it in the Windows search bar
Step 2: In the description section, select the option “Clean up system files.” Then select the drive that you intend to clean and click OK.
Step 3: In the Disk Cleanup tab, check the boxes next to the file types that you want to be deleted. Click OK. Finally, click “Delete Files.”
Method #8 Check Your Disk for Errors
A problem in the hard disk may be the cause of the Memory Management error. We can use the Command Prompt to detect and repair the faulty disk. Following are the steps to check and repair the hard disk:
Step 1: Open Command Prompt as administrator. Search “cmd” in the Windows search bar, then click “Run as administrator.”
Step 2: Type the following command and press Enter:
chkdsk c: /f /r
If the system file is in any other drive, mention that drive instead of C
Step 3: The scan may not be possible immediately if the system file is in C, the primary drive, as it is in use. You will be asked if you want to schedule the scan for the next system reboot. Type Y to answer yes, and press Enter.
Step 4: Restart the system. The scan will then start automatically. Once complete, check whether the error has been rectified.
In Windows 7, an alternative technique is available to check the disk for errors. In the storage drive, right-click the drive that you intend to check, and click Properties. Then go to Tools tab and click Check option under “Error-checking.”
Method #9 Remove Recently Installed Software
Reinstalling a new program can cause the Stop Code Memory Management error. If none of the previous solutions worked, try uninstalling any newly-installed program. To do so, proceed as follows:
Step 1: Open Control Panel in the Start menu
Step 2: Look for the “Uninstall a program” option under “Programs” and click on it.
Step 3: Select the new programs and click Uninstall
Step 4: Restart the PC and check if the error persists or not.
Method #10 Check for Programs Causing Memory Leaks
The Memory Management error can occur due to any process having high memory usage and causing memory leaks. Disable the unnecessary process running in the background at the moment. To do so, follow the steps below:
Step 1: Open Task Manager by searching it in the Windows search bar.
Step 2: Check the Processes column. Select the processes having high memory usage and click End Task to terminate it.
Method #11 Manually increase Virtual Memory
Increasing the virtual memory of the computer can help solve the Memory Management problem related to memory management. Follow the instructions below to do it manually (since no app exists for this purpose):
Step 1: Open “Advanced system settings” by searching it in the Windows search bar.
Step 2: Go to the Advanced tab.
Step 3: Click Settings in the “Performance” section.
Step 4: In the new window that will open, go to the Advanced tab.
Step 5: Navigate to the “Change” option in the Virtual Memory section and click on it.
Step 6: Uncheck the “Automatically manage paging file size for all drives“box.
Step 7: Select the drive under “Drive (Volume Label).”
Step 8: Select “Custom size.”
Step 9: Enter a new size in megabytes in the Initial size (MB) or Maximum size (MB) box. Then click on Set. Finally, click, OK.
Thus, it will expand the virtual memory.
Method #12 Reset the PC
The System Restore feature enables the restoration of an earlier state of the system. This might help fix the error if it occurred after the installation of any new software or feature. Following are the steps to run the system restore in Windows 10:
Step 1: Open Settings.
Step 2: Navigate to the Update and Security section.
Step 3: Select Recovery in the left panel.
Step 4: Press the “Get Started” option under “Reset this PC.”
Step 5: Select “Keep Your Files” option.
Step 6: Follow subsequent instructions displayed on the screen and complete the System Restore.
This will lose some customizable features and other data, but your personal files will be safe.
Also Read:
- WebGL Hit A Snag
- Unknown USB Device (Device Descriptor Request Failed)
- Update Error Code 0x80070643
- SppExtComObjPatcher.exe
Conclusion
Thus, various techniques to fix the Memory Management error and the accompanying BSoD have been discussed. Depending on the cause of the problem, anyone of the methods should work.